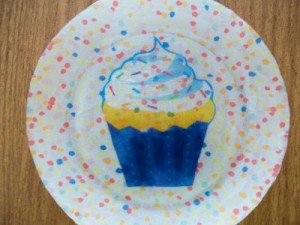
I wanted to share this really cute craft idea with you. We did this during our craft night at GEMS. I can’t take credit for it though. My fellow craft counselor and friend, Ruth, came up with this idea. The plate we created was a “celebration” plate. The center design is a cute cupcake and has a speckled background.
We bought paper napkins that had the cupcake design. For the background, we used a decorative paper table cloth that was a slightly thicker paper than the napkin.
I recently posted a few ideas about gifts for teachers and nurses. This would also be a great handmade gift for Teacher Appreciation or for Nurse’s Day or Mother’s Day. Also, consider using different napkins for different designs to create holiday themed plates. Maybe a snowman or Santa for Christmas, or pumpkins or fall leaves for autumn, stars and stripes for the 4th of July. The options are endless.
Here a list of supplies you will need for this craft project:
- Mod Podge
- Foam paint brush
- Clear glass plate (We bought them at Dollar Tree dollar store for $1.00)
- Decorative napkin and/or table cloth (Choose the design of your choice.)
- Razor blade and scissors
- Newspapers
Now, here’s what you do:
- Remove any labels and wash and dry the plate.
- Cut out the decoration for your plate. For this plate, we cut out a cupcake design from a paper napkin.
- Measure and cut out the background material, leaving about one inch of the material beyond the edge of the plate. For our background material, we used a decorative paper tablecloth purchased at Target.
- Cover your working space with newspaper.
- Lay the plate face down on the newspaper.
- Using the foam paint brush, generously cover the back side of the plate with mod podge.
- Center your decoration (Cupcake) in the center of the plate.
- Apply a coat of mod podge over the cupcake, and smooth out any bubbles in the napkin/cupcake.
- Spread the background material (paper tablecloth design) over the back of the plate.
10. Generously apply another coat of mod podge over the tablecloth design, ensuring that mod podge covers all the way to the edges.
11. Smooth out any bubbles in the design and smooth the tablecloth over the rim of the plate.
12. Once you have the tablecloth smoothed and you are certain it is adhering to the rim, allow the plate to dry for a few hours, or overnight.
13. Once the plate is dry, trim the excess from the rim with the razor blade.
There you have it – a really cute celebration plate. The plate of course can’t be submerged in water to wash it, but you can wipe off the face with a damp cloth.
If you are giving this as a gift, you might consider filling the plate with some home baked cookies. I recommend trying my recipe for Best Ever Chocolate Chip Cookies.


Wow! Very creative. I’ll have to give it a try.
Thanks. Think of all the cute patterns you can use to make a variety of plates. Keep me posted on what you create.